

The Zoom meeting platform is quick and easy to use, you can get started with just a smartphone. We have been delving in to the more advanced settings to get even better results. Please don’t be put off if you are not technically minded, we can help you get set up 🙂
In Brief:
- If possible use a laptop or desktop computer.
- Plug your device in or make sure sure you have a full charge.
- Use an ethernet cable to get a strong internet signal if at all possible.
- Set up so the teacher can see you as close as possible.
- Headphones will give you a much better sound. Perhaps try one ear on and one ear off so you can hear your instrument and your teacher.
Your Set-Up at Home
Make sure you have plugged in your devices and are not running on battery power. You don’t want to have your lesson ended by a device unexpectedly shutting off.
If you can connect your device directly to the internet with an ethernet cable your connection will be much more stable and powerful. WiFi can work fine, but try to be close to your router to get the maximum signal.
Unless you have super-fast fibre, it would be best if everyone in your house is not also on the net during your lesson, as it will slow your connection down. If you have a choice of devices, we’d suggest using a computer or laptop since you may have access to audio settings not found on smaller devices. These can drastically affect the quality of your audio.
Hearing your Trinity ‘Play’ App (and other play along audio)
You can get a great sound by plugging in your phone/ tablet directly into the back of your Drum Module or Keyboard. There is usually a mini jack connection called ‘Mix In’ on the back of your instrument. Just connect with a mini jack lead (available very cheaply on Amazon).
The latest models of drums and keyboards (E.g. TD-17 and Roland Go Piano) offer Bluetooth connectivity with your device , so you might not even need a lead, you will hear your instrument mixed with the Trinity songs through your headphones.
If you don’t have this facility you could use a Bluetooth speaker or plug into an amplifier.
We strongly recommend getting your play along audio through headphones or an amplifier. Listening through a phone speaker will not be a good or productive experience for any student.
Amplifying Electronic Drums and Keyboards (and your Trinity App)
If you want to hear your instrument out loud and you haven’t yet got an amplifier, you could try the Behringer K450FX
https://www.thomann.de/gb/behringer_k450fx.htm £137
It’s a perfect amp for electronic drums/ keyboards and it also has a microphone input (if you want to sing) along with an input for CD/phone etc. There is a headphone input too.
You will also need to connect the drums/ keys to the amp. £6.99
6.35mm 1/4″ Jack to 1/4″ Jack PA Speaker Cable/Guitar Amp Head/Cab Lead 2m
https://www.amazon.co.uk/dp/B01CSQO0QS/ref=cm_sw_em_r_mt_dp_U_k6iKEbKEH216J
Lead to connect your smart device to an amplifier:
Cable Mountain HQ 2 Metre 3.5mm to 2 x Phono Plugs Gold Metal Cable
by Cable Mountain £4.25
https://www.amazon.co.uk/dp/B000NHOMSQ/ref=cm_sw_em_r_mt_dp_U_N3iKEbSR5MPBS
There are many other models of amplifier that will do this job well. We have just selected a mid-priced suggestion.
Get Prepared
In general, you’ll need to think a little differently when you prepare for your lessons.
During the lesson you won’t be able to play along at the same time as your teacher, or with your teacher’s backing track on their computer, because there is a time lag (latency) for all online lessons. For this reason you will need to prepare any play along songs/ exercises ready to be heard at home.
For example, if you are studying for a Trinity grade, please have the book ready and the play along songs audible to you. It would be ideal if the Trinity App is on a separate device so you can control the music in your lesson.
A metronome would be very useful for some lessons.
Guitar players, please tune up before your lesson.
If you have been sent any PDFs by your teacher please print them or they might contain hyperlinks for video examples etc. Please view them on a smartphone/ tablet or computer so you can click on the links.
Technical Set-up Before First Lesson – Checklist
- Can you and the teacher see each other?
If not, someone has Stop Video pressed. It’s at the bottom. - Can you and the teacher hear each other talking?
First of all make sure you have ticked Join With Audio. If still no sound, is Mute switched on? If so, it’s at the bottom left of Zoom Window. If still no sound, the microphone has not been enabled in the Zoom settings, when the meeting started. Go in the Settings on your device, scroll through all your apps to Zoom at the bottom, go in and turn the microphone on. - What device are you using?
If it’s a Desktop or Laptop there are a number of Audio settings that you can adjust that can make a big difference. (see below) - What View?
Gallery View is normally better – you can see yourself and your teacher equally on the screen. Change to Gallery View in the top right corner, or by tapping the screen on a tablet (top left). Try swiping on a smartphone to get the Gallery setting. - Can we see you playing?
Sort your camera angle so your teacher can see your hands and your instrument. You might have to bring a new table in etc. For keyboards, it’s ideal if the camera is slightly behind you and to the side, so we can see your hands and the keyboard clearly. - Is it too dark/ too light?
Open/ close curtains, draw blinds, turn lamps on/ off etc as you need to.
Can you and your teacher hear you playing your instrument clearly?
Adjust your volume as necessary. The lessons also work better if you wear headphones (from your computer/ device) – it cuts out the feedback. Try wearing headphones half-on half-off, so you can hear yourself playing out loud at the same time as listening to your teacher.
You can adjust your volume/ move your device closer or further away. Student acoustic drums will need to be severely damped with pads or Tee Shirts and the bass drum should be full of cushions/ or a quilt.
You can also get excellent sound reducing pads RTOM Black Hole Pads. But they are quite expensive!
This is where the more advanced audio settings may help.
A USB microphone would help you to get a great sound (see page 7)
Joining The Lesson
You will have been sent a meeting invitation with a URL for your lesson. Click on the URL at the lesson start time, and Zoom should open.
You will be placed in the Virtual Waiting Room (particularly if your tutor is doing back-to-back lessons and may be finishing the previous lesson). Your tutor will admit you when they are ready to start. If you can’t join the session, try logging out and starting again.
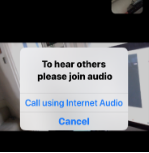
Click “Join with Internet Audio”. (Zoom also lets you join with just phone audio, but we don’t want that). If there are any problems joining a lesson, email info@musicstation.pro, and we will answer you as soon as possible.
Lesson Etiquette and Safeguarding
Lessons must take place in a room with an open door and parents/guardians must provide that one of them or for a trusted adult shall be in the same premises as the pupil while the lesson takes place.
Students are expected to dress and behave appropriately. If there is inappropriate attire, we will have to terminate the lesson and explain the reason for doing so. The lesson can resume when the pupil is suitably attired.
The same applies if a student behaves inappropriately, and it may be necessary to take further action if this happens, just as you would with a face-to-face lesson.
Recording your lessons.
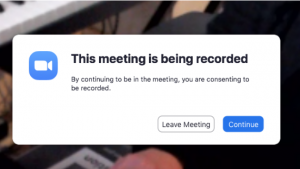
You will be notified at the start of the lesson that the session is being recorded. Please ensure you click okay for this, otherwise the lesson cannot proceed. These recordings are being made for the purpose of safeguarding both our students and tutors. Please note that we take everyone’s privacy and security very seriously, and can assure you that the videos will be stored securely by MusicStation, will not be shared to anyone, and will be deleted after a designated period of time.
As soon as you join the lesson you will see a message that the meeting is being recorded.
If you would like to video the lesson yourself, please check with the tutor first. You must agree that you will not share, or post to social media any recordings, and that you will securely delete and dispose of any recordings of your lesson if requested. We cannot provide our Zoom recordings to students – the files are too big so it would be administratively impossible.
Audio Settings
To get into the Audio Settings, either click on the carat next to the Mute button (bottom left of the Zoom window), or go to zoom.us at the top of their computer, then Preferences, then Audio.
In the audio settings, you can adjust speaker and mic volumes, and turn off the “automatically adjust microphone button”. (It’s better off than on, otherwise the mic is trying to constantly flatten the sound – Zoom is really designed for conversation, not musical sound with dynamics.)
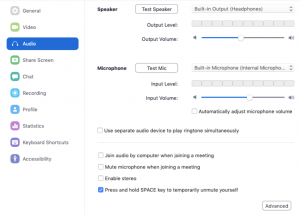
Next – Go to the Advanced Link (bottom right)
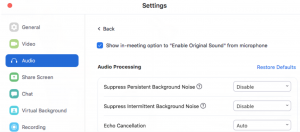
Tick the Enable Original Sound option.
Now disable the Suppress Persistent Background Noise and Suppress Intermittent Background Noise options.
This will help their microphone to deal with musical sounds rather than just speech.
Now Turn On Original Sound (top left of your Home screen) – This will make you sound fuller and less compressed.
If you only have a tablet or phone, you can’t adjust audio settings – you will just need to experiment with the positioning of your device/ volume levels in your room until you get the optimum sound available.
Further lesson enhancements (not absolutely necessary)
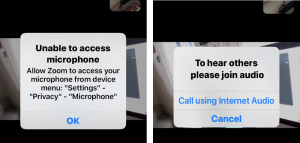
Some keyboard students (and tutors) are using two devices so one is angled on a close up of their hands/ keyboard and the other is the one they look at during the lesson. To do that (it’s not massively complicated), you join the meeting from two devices and turn the microphone off on one of them. (If two mics are on, there will be echo and feedback.) One device needs to be “unable to access microphone” (see screenshot) and then on the next message click Cancel, not Call using Internet Audio.
Microphones
USB microphones can greatly improve the audio that you send to your teacher during your lesson. They are great for all types of online lessons and can also be used to record your performances in high quality. They plug directly into your computer/ device.
A couple of options:
Logitech Blue Microphones Yeti USB Microphone £100
Samson Meteor USB Studio Cardioid Microphone £75
Blue Microphones Snowball iCE USB Mic £50
Cameras
A webcam will give you a much clearer picture and sound, it can also be more easily moved to get better viewing angles.
If you have a DSLR camera it might be possible to use it as a high quality webcam. Please have a look at either of the links below for more information. I have done it on a Mac with a Canon 700D and the quality is excellent.
These videos explain how it can be done.
https://sparkosoft.com/how-to-use-dslr-as-webcam
https://docs.crowdcast.io/en/articles/1935406-how-to-use-your-dslr-as-a-webcam
Advanced Zoom Tips
This setup is using a DSLR camera and a USB interface for the drums and vocal microphone.
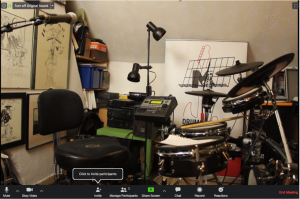
This is my home screen on Zoom. I am selecting to use my camera and Roland Go USB Mixer.
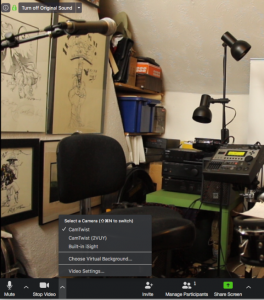
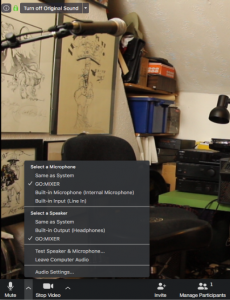
If you have a separate webcam or a streaming DSLR you can select it here. This link also takes you to your video settings …
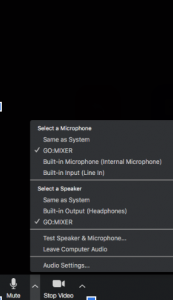
Click on Audio Settings
You can adjust your speaker and mic settings. I am getting a high quality sound through the Roland Go USB mixer (you could use any interface with three inputs – one for your mic, one for your instrument, and one for your computer sound, for Youtube clips etc). If your interface doesn’t have enough inputs, you could run everything into a mixer then into the interface. Then run your headphones out of your interface. Ask us for help if you would like to set up something similar.
Set-Up Using a Roland Go Mixer
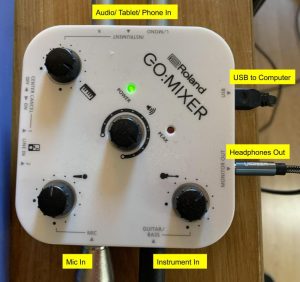
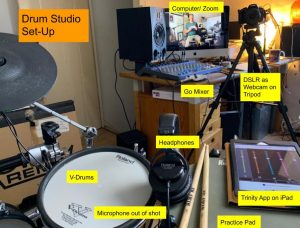
The Roland Go Mixer is £69
If you use a USB mixer you will need a microphone. This mic is only £19.99.
A microphone stand is also a necessity. This one is also £19.99
Practice Diaries
Please fill in your Practice Diary at the end of each lesson to keep track of your practice tasks.
You can print this page if you need to.
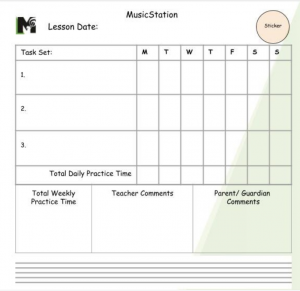
Download Weekly Practice Diary Sheet 2018
Download of this document MusicStation Online Lessons – New Guidance For Parents April 2020